
| Version 8 (modified by , 6 years ago) ( diff ) |
|---|
IPMI
IPMI allows us to access a physical server removetly, as if we were in the colo with a monitor and keyboard plugged in. At least in theory. We used to use a simple serial cable to achieve this feat. However, new servers are no longer beings shipped with serial ports and motherboard/bios software no longer support them. Instead, we are expected to use IPMI.
IPMI provides a million ways to connect, but we are enabling two. Both are configured to use a local, non-routable IP address.
- web-based access (we will setup nginx to proxy from a public address to the non-routable address)
- serial over LAN access, using ipmiutil which will be run from a server in the cabinet
Unfortunately, IPMI is complex and varies considerably from computer to computer. Here are the steps used to connect john.
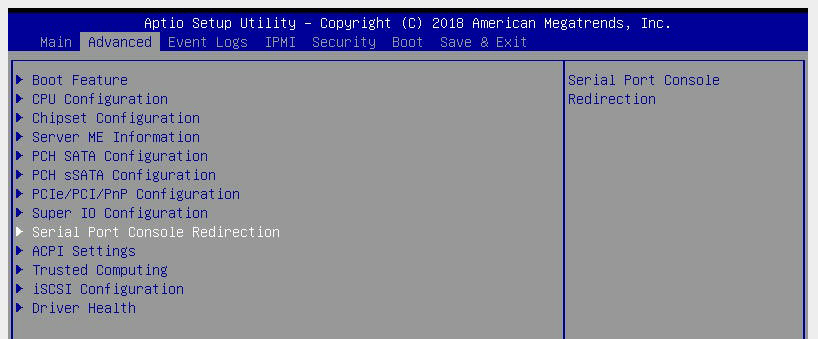
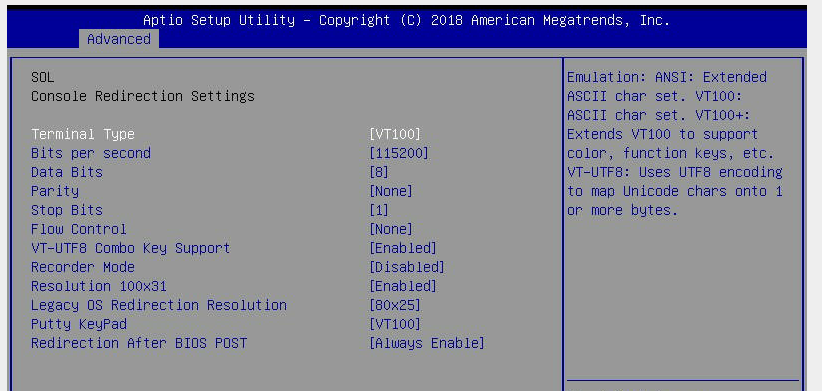
BIOS/Setup
When you first boot the computer, IPMI has to be enabled and assigned an IP address.
We use a non-routable IP address so the only way to connect to IPMI is via a machine in the colo itself.
Below are the screen shots of the bios and their settings.


Setup IPMI
Now, you can access the IPMI web configuration. But... by default it will redirect http to https. That messes up the proxy via nginx thing so we have to turn that off.
Set your computer which is in the cabinet and plugged into the swtich to use an IP address in the same network, e.g.:
sudo ip addr add 192.168.56.99/24 dev enp1s0f2
Then, point your browser to the IP address you assigned the IPMI server above and click through the self-signed certificate warnings.
The default user pass is: ADMIN/ADMIN - case sensitive!
Here are some important changes:
- Configuration -> Users
- Change password for ADMIN user. NOTE make password 16 characters or less and keep out weird characters. It is possible to lock yourself out with this step.
- Configuration -> Port
- Only check off Web port (80) and Ikvm server port (5900)
Now, you can access the "monitor" by clicking Remove Control -> iKVM/HTML5
Enable http redirections
On robideau, we have the following nginx configuration name <server>.conf to allow lets encrypt to find and validate https certificates:
server {
  listen 80;
  server_name ipmi.john.mayfirst.org;
  root /var/www/html;
  location /.well-known/acme-challenge {
    try_files $uri $uri/ =404;
  }
  location / {
    return 301 https://$host$request_uri;
  }
}
In addition, we have this <server.ssl.conf version to actually proxy to the IPMI server:
server {
  listen 443;
  server_name ipmi.john.mayfirst.org;
  location /.well-known {
    root /var/www/html;
  }
  location / {
    access_log off;
    proxy_pass http://192.168.56.3:80;
    proxy_set_header X-Real-IP $remote_addr;
    proxy_set_header Host $host;
    proxy_set_header X-Forwarded-For $proxy_add_x_forwarded_for;
    proxy_set_header Upgrade $http_upgrade;
    proxy_set_header Connection "Upgrade";
  }

  ssl on;
  ssl_certificate_key /etc/letsencrypt/live/ipmi.john.mayfirst.org/privkey.pem;
  ssl_certificate /etc/letsencrypt/live/ipmi.john.mayfirst.org/fullchain.pem;

  ssl_ciphers 'AES128+EECDH:AES128+EDH:!aNULL';

  ssl_protocols TLSv1 TLSv1.1 TLSv1.2;
  ssl_session_cache shared:SSL:10m;

  ssl_prefer_server_ciphers on;
  ssl_dhparam /etc/ssl/dhparam.pem;

  # Don't use strict transport or it may mess up lets encrypt.
  #add_header Strict-Transport-Security max-age=63072000;
  add_header X-Content-Type-Options nosniff;
}
The ssl section must be disable initially until lets encrypt can be run to generate the cert.
Also, you need to create dlparams with:
openssl dhparam -out /etc/ssl/dhparam.pem 2048
And, of course, you need to create a DNS record so that a domain (e.g. ipmi.john.mayfirst.org) points to robideau's IP address.
So-called Serial access
On robideau, or your jump host, install ipmiutil.
Then, create a simple bash script to help you remember the command:
ipmiutil sol -V 4 -a -N 192.168.56.3 -U ADMIN -Y
You will be prompted for the password.
Setup Linux
After installing linux, edit /etc/default/grub and change GRUB_CMDLINE_LINUX to:
GRUB_CMDLINE_LINUX="console=tty0 console=ttyS1,115200n8"
NOTE! This is different from the norm - we want ttyS1 not ttyS0 like we typically put in there.
And add:
GRUB_TERMINAL=serial
GRUB_SERIAL_COMMAND="serial --unit0 --word=8 --parity=no --stop=1"
Disable web config
Once you have working serial access, be sure to delete the link to the <server>.ssl.conf file in site-enabled so it is no accessible (but keep the <server>.conf file so letsencrypt can do it's job.
Attachments (7)
- 1.advanced-super-io.png (135.1 KB ) - added by 7 years ago.
- 2.advanced-superio-SOL.png (58.4 KB ) - added by 7 years ago.
- 3.advanced-serial-port-console-redirection.png (134.4 KB ) - added by 7 years ago.
- 4.advanced-serial-console-redirection-first-page.png (98.2 KB ) - added by 7 years ago.
- 5.advanced-console-redirection-settings-first.png (179.1 KB ) - added by 7 years ago.
- 6.advanced-console-redirection-settings-second.png (97.5 KB ) - added by 7 years ago.
- 7.ipmi-settings.png (100.4 KB ) - added by 7 years ago.
Download all attachments as: .zip